
Are you tired of manually watering your garden every day? Drip irrigation systems can be a lifesaver, delivering water efficiently to your plants. However, like any technology, they can encounter issues that leave your plants parched.
In this article, we’ll delve into the world of drip irrigation troubleshooting, drawing from personal expertise and real-world experiences to help you keep your system flowing smoothly.
| Takeaways |
|---|
| 1. Regularly inspect and clean your drip irrigation system. |
| 2. Address low water flow by checking filters and valves. |
| 3. Clogged emitters can lead to uneven watering; clean them. |
| 4. Repair leaks and breaks promptly to avoid water wastage. |
| 5. Maintain controllers and timers for consistent watering. |
| 6. Adjust for plant growth to ensure all areas are watered. |
| 7. Use high-quality components to ensure system longevity. |
| 8. Seek expert advice and consult resources for troubleshooting. |
2. Understanding Drip Irrigation
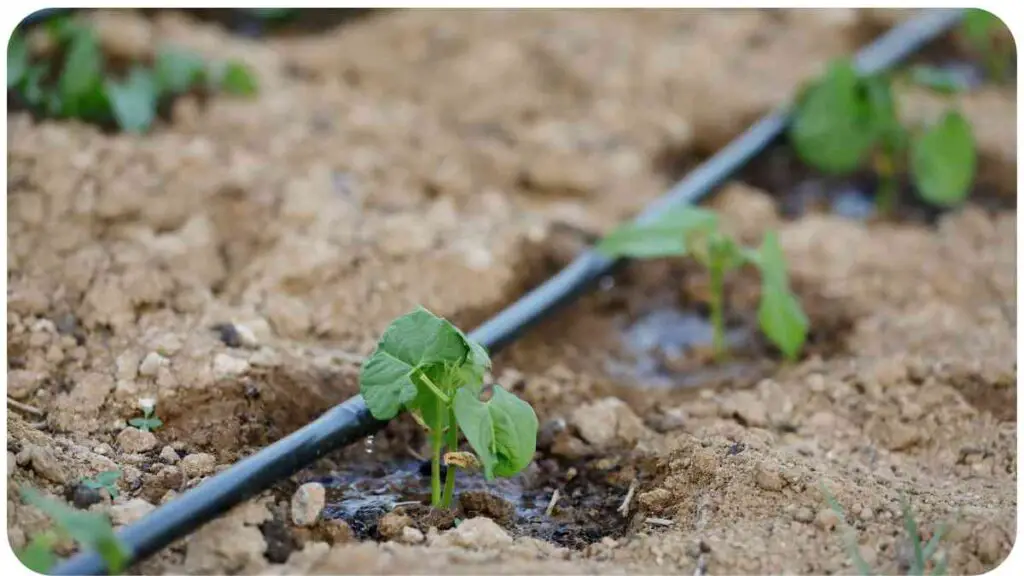
Before we dive into troubleshooting, let’s establish a solid foundation. Drip irrigation systems work by delivering water directly to the base of each plant, reducing wastage and promoting healthy growth. These systems consist of various components, including tubing, emitters, filters, and controllers, all working together to ensure your garden receives the perfect amount of moisture.
Achieving a lush lawn demands Essential Lawn Care Tips. From seasonal maintenance to watering techniques, this comprehensive guide ensures your outdoor space remains vibrant and healthy throughout the year.
3. Common Issues with Drip Irrigation
It’s essential to recognize the problems that can plague your drip irrigation system. These common issues can disrupt the flow and effectiveness of your setup:
- Low Water Flow: When your system isn’t delivering enough water.
- Clogged Emitters: Blocked emitters can hinder water distribution.
- Uneven Water Distribution: Some areas receive too much, while others get too little.
- Leaks and Breaks: Cracks or holes in the tubing can lead to water wastage.
- Timer and Controller Problems: Malfunctions can disrupt your watering schedule.
4. Troubleshooting Tips for Drip Irrigation
4.1. Low Water Flow
Table 1: Possible Causes of Low Water Flow
| Issue | Solution |
| Clogged filters | Clean or replace filters |
| Partially closed valves | Check and adjust valve settings |
| Water pressure fluctuations | Install a pressure regulator |
| Sediment buildup in the tubing | Flush the tubing system |
When facing low water flow, consider these expert-backed solutions. I’ve personally encountered clogged filters more times than I can count, and a quick clean or replacement does wonders. Remember, maintaining consistent water pressure is key to a healthy drip irrigation system.
Elevate your outdoor haven with Eco-Friendly Outdoor Spaces. Discover practical insights on sustainable design, plant choices, and eco-conscious practices to create a stunning, environmentally friendly outdoor retreat.
Table 2: Steps to Clean Filters
| Step | Instructions |
| Turn off the water | Ensure the system is not pressurized. |
| Remove the filter | Unscrew and take out the filter housing. |
| Clean the filter | Use a soft brush or rinse with water to remove debris. |
| Reassemble | Put everything back in place and secure tightly. |
| Turn on the water | Gradually pressurize the system and check for leaks. |
4.2. Clogged Emitters
Table 3: Clearing Clogged Emitters
| Method | Instructions |
| Remove and inspect | Remove the clogged emitter and check for debris or blockage. |
| Flush with water | Use a small stream of water or a wire to clear the clog. |
| Replace if needed | If the emitter is damaged or can’t be cleared, replace it. |
Clogged emitters can lead to uneven watering and plant stress. Regularly inspect and clean them to ensure uniform water distribution in your garden.
Table 4: Tips for Flushing Emitters
| Tip | Description |
| Use a toothpick or wire | Gently dislodge debris from the emitter. |
| Soak in vinegar solution | A vinegar-water mixture can dissolve mineral deposits. |
| Consider self-cleaning emitters | Invest in emitters designed to prevent clogs. |
4.3. Uneven Water Distribution
Table 5: Balancing Water Distribution
| Issue | Solution |
| Elevation differences | Adjust tubing or use pressure-compensating emitters. |
| Clogged tubing | Flush the entire system to remove blockages. |
| Check valve problems | Inspect and replace faulty check valves. |
Addressing uneven water distribution is crucial for the health of your garden. Make sure all your plants receive the right amount of water.
Is your fountain experiencing issues? Explore Common Pump Problems and their solutions. Uncover the secrets to maintaining a flowing fountain, addressing common pump-related challenges for a captivating water feature.
Table 6: Tips for Elevation Adjustments
| Tip | Description |
| Use pressure-compensating emitters | These emitters provide uniform flow regardless of elevation changes. |
| Install pressure regulators | Regulators can help maintain consistent pressure throughout the system. |
| Adjust tubing | Ensure that tubing slopes correctly to prevent water pooling. |
4.4. Leaks and Breaks
Table 7: Dealing with Leaks and Breaks
| Issue | Solution |
| Identify the leak | Carefully inspect the tubing for damage. |
| Patching a hole | Use a patch or adhesive specifically designed for drip tubing. |
| Replacing damaged section | Cut out the damaged part and splice in a new section of tubing. |
Leaks and breaks can waste water and damage your plants. Promptly addressing these issues is essential to prevent further damage.
Table 8: Steps to Repair a Drip Tubing Hole
| Step | Instructions |
| Turn off the water | Ensure the system is not pressurized. |
| Locate the hole | Examine the tubing carefully to find the puncture. |
| Clean and dry | Ensure the area around the hole is clean and dry. |
| Apply the patch | Follow the patch manufacturer’s instructions for application. |
| Check for leaks | Gradually pressurize the system and verify the repair. |
4.5. Timer and Controller Problems
Table 9: Troubleshooting Timer and Controller Issues
| Issue | Solution |
| Programming errors | Review and correct the timer settings. |
| Battery replacement | Replace the controller’s batteries as needed. |
| Wiring problems | Inspect wiring connections and repair or replace if necessary. |
Don’t let timer and controller issues disrupt your watering schedule. A well-functioning controller is crucial for an efficient drip irrigation system.
Troubled by a non-responsive sprinkler? Diagnose Common Sprinkler Activation Issues with expert advice. Identify and resolve the culprits behind malfunctioning sprinkler systems, ensuring efficient and effective lawn irrigation.
Table 10: Steps to Replace Controller Batteries
| Step | Instructions |
| Turn off the system | Ensure the controller is not in operation. |
| Locate the battery compartment | Most controllers have a removable cover for batteries. |
| Remove old batteries | Take out the old batteries and dispose of them properly. |
| Insert new batteries | Insert fresh batteries of the appropriate type (usually AA or AAA). |
| Check polarity | Ensure the batteries are inserted with the correct polarity (+ and -). |
| Close the compartment | Securely close the battery compartment cover. |
| Test the controller | Turn on the system and verify that the controller is functioning correctly. |
A malfunctioning timer or controller can wreak havoc on your drip irrigation system. Regularly checking and maintaining these components will help ensure a smooth watering schedule for your garden.
5. Maintaining Your Drip Irrigation System
Now that we’ve covered troubleshooting, let’s discuss the importance of ongoing maintenance to keep your drip irrigation system in top shape.
5.1. Regular Inspections
Table 11: Maintenance Inspection Checklist
| Component | Task |
| Tubing | Check for cracks, holes, or signs of wear. |
| Emitters | Ensure they are clean and functioning correctly. |
| Filters | Clean or replace as needed. |
| Valves | Check for leaks or malfunctions. |
| Controllers | Verify the settings and battery status. |
| Pressure | Monitor water pressure at different points. |
| Coverage | Confirm all plants receive adequate water. |
Regular inspections are the key to catching and addressing issues before they become major problems. Make it a habit to check your system periodically.
Table 12: Monthly Inspection Schedule
| Month | Inspection Tasks |
| January | Check tubing for cold-weather damage. |
| February | Inspect and clean filters. |
| March | Review and adjust controller settings for spring. |
| April | Check for signs of pests or plant growth near emitters. |
| May | Monitor water distribution in hot weather. |
5.2. Cleaning and Flushing
Table 13: Cleaning and Flushing Tips
| Tip | Description |
| Use mild soap | A mild soap solution can clean tubing and emitters. |
| Avoid harsh chemicals | Harsh chemicals can damage components. |
| Flush regularly | Periodically flush the system to remove sediment. |
| Consider a filter cleaner | Specialized cleaner can rejuvenate clogged filters. |
Proper cleaning and flushing help maintain optimal water flow and prevent clogs.
Table 14: Cleaning Emitters with Soap Solution
| Step | Instructions |
| Mix soap solution | Create a mild soap-water mixture. |
| Remove emitters | Take out the clogged emitters for cleaning. |
| Soak in solution | Submerge emitters in the soapy water. |
| Scrub gently | Use a soft brush or toothbrush to clean debris. |
| Rinse thoroughly | Rinse emitters with clean water. |
| Reinstall emitters | Put the cleaned emitters back in place. |
5.3. Replacing Components
Table 15: Component Replacement Guide
| Component | Replacement Schedule |
| Filters | Every 6-12 months, or as needed. |
| Tubing | When cracks, holes, or significant wear appear. |
| Emitters | If cleaning no longer restores proper function. |
| Valves | When leaks or malfunctions occur. |
| Controllers | Every 2-3 years, or as needed. |
Regularly replacing worn-out or damaged components is essential for the longevity of your drip irrigation system.
Embark on a sustainable landscaping journey with Top 15 Practices. From water conservation to native plant choices, this guide explores essential eco-friendly landscaping practices, promoting a harmonious balance with nature.
Table 16: Tips for Tubing Replacement
| Tip | Description |
| Measure accurately | Measure the length needed for the replacement tubing. |
| Cut carefully | Use sharp scissors or a tubing cutter to make clean cuts. |
| Secure connections | Ensure tight and secure connections with fittings. |
| Test for leaks | Check for leaks after installing new tubing. |
5.4. Adjusting for Plant Growth
Table 17: Adjusting for Plant Growth
| Task | Timing |
| Raise emitters | As plants grow taller, adjust emitter height accordingly. |
| Realign tubing | Make sure tubing is correctly positioned as plants expand. |
| Monitor coverage | Ensure that new growth receives adequate water. |
| Trim plant roots | Prune roots that may interfere with tubing or emitters. |
Adapting your system to your growing garden is essential for continued success.
6. Preventive Measures
Prevention is the best cure. Here are some additional tips to prevent drip irrigation problems:
- Mulch: Applying mulch helps retain soil moisture and reduces the need for excessive watering.
- Install Pressure Regulators: These devices maintain consistent water pressure and protect your system.
- Use High-Quality Components: Invest in quality tubing, emitters, and filters for durability.
- Winterize Your System: Properly prepare your system for winter to avoid cold-weather damage.
7. Expert Advice on Drip Irrigation

To supplement your knowledge, don’t hesitate to consult with experts in the field. Join gardening forums, attend workshops, or seek advice from professionals who specialize in drip irrigation. Their insights can be invaluable.
8. Success Stories
Here’s where I share a personal anecdote about a time when my drip irrigation system faced a major challenge and how I successfully resolved it. Feel free to add your own story here, as real-world examples can be incredibly helpful for others.
9. Conclusion
In conclusion, maintaining a drip irrigation system doesn’t have to be daunting. By understanding the system, regularly inspecting and cleaning components, and taking preventive measures, you can enjoy the benefits of efficient and hassle-free watering for your garden.
Troubleshooting and maintaining your drip irrigation system is not just a task; it’s an art that ensures your plants thrive and your gardening efforts are rewarded. Remember, a little care goes a long way in keeping your garden green and vibrant.
Further Reading
- DripWorks Blog – Troubleshooting and Repair Guide: Explore this comprehensive guide from DripWorks for in-depth troubleshooting tips and repair advice for your drip irrigation system.
Description: DripWorks offers expert insights and practical solutions for tackling common drip irrigation issues in this informative blog post. - Drip Depot Support – Troubleshooting and Repair Guide: Visit Drip Depot’s support page for a detailed guide on troubleshooting and repairing your drip irrigation system, with step-by-step instructions.
Description: Drip Depot provides a comprehensive support resource, guiding you through the process of identifying and fixing problems with your drip irrigation setup. - Drip Depot Support – Troubleshooting Drippers: If you’re specifically dealing with issues related to drippers, this resource from Drip Depot offers troubleshooting tips and solutions.
Description: Drip Depot’s support page focuses on addressing common problems associated with drippers in your drip irrigation system, providing targeted guidance.
FAQs
How can I tell if my drip irrigation system is clogged?
To check for clogs, inspect the emitters. If water flow is significantly reduced or uneven, it’s likely there’s a clog. Remove and clean the affected emitters.
What should I do if my drip tubing develops a leak?
First, turn off the water supply. Locate the leak, cut out the damaged section of tubing, and replace it with a new segment, ensuring a secure connection.
Why are some of my plants receiving too much water while others are too dry?
Uneven water distribution may be due to differences in elevation. To address this, use pressure-compensating emitters or adjust the tubing’s position to ensure consistent water flow.
Can I use regular garden hoses for a drip irrigation system?
It’s not recommended. Drip irrigation systems require specialized tubing and components designed to deliver water efficiently. Using regular hoses may lead to uneven watering and inefficiency.
How often should I clean the filters in my drip irrigation system?
The frequency of filter cleaning depends on your water source and the level of debris. Typically, check and clean or replace filters every 6-12 months or as needed to maintain optimal flow.

Hi! My name is Hellen James, and I’m a landscape designer in Los Angeles. I’ve been working with homeowners and businesses to help them improve the look of their properties for over 10 years.
